Apollo配置中心
GItHub:https://github.com/apolloconfig/apollo
官方文档:https://www.apolloconfig.com/#/zh/usage/apollo-user-guide
官方初始化Sql
https://github.com/apolloconfig/apollo-quick-start/tree/master/sql
优秀部署文章:https://blog.csdn.net/weixin_43515220/article/details/113623874
一、概念信息
1. 关键概念
为了避免参数变化引起的频繁的程序改动,通常我们在应用程序中将常用的一些系统参数、启动参数、数据库参数等等写到配置文件或其他的存储介质里面。
- 配置常见的存储方式:配置文件、数据库等
- 配置对于应用程序是只读的,程序通过读取配置来影响程序的运行行为
- 配置是区分环境的同一份程序部署到生产、测试、开发、演示环境下,需要做不同的配置
Apollo中的几个核心概念:
- application (应用):当前使用apollo的集中配置管理的应用程序
- environment (环境):生产、测试、开发环境等。或者操作系统的环境:windows、linux等。
- xxxxxxxxxx yaml
- namespace (命名空间):多个应用之间存在公共应用组件,为公共应用组件配置设置namespace(标签)。方便其他应用引用其配置。
2. 特性
统一管理不同环境、不同集群的配置
- Apollo提供了一个统一界面集中式管理不同环境(environment)、不同集群(cluster)、不同命名空间(namespace)的配置。
- 同一份代码部署在不同的集群,可以有不同的配置,比如zookeeper的地址等
- 通过命名空间(namespace)可以很方便地支持多个不同应用共享同一份配置,同时还允许应用对共享的配置进行覆盖
配置修改实时生效(热发布)
- 用户在Apollo修改完配置并发布后,客户端能实时(1秒)接收到最新的配置,并通知到应用程序
版本发布管理
- 所有的配置发布都有版本概念,从而可以方便地支持配置的回滚
灰度发布
- 支持配置的灰度发布,比如点了发布后,只对部分应用实例生效,等观察一段时间没问题后再推给所有应用实例
权限管理、发布审核、操作审计
- 应用和配置的管理都有完善的权限管理机制,对配置的管理还分为了编辑和发布两个环节,从而减少人为的错误。
- 所有的操作都有审计日志,可以方便地追踪问题
客户端配置信息监控
- 可以在界面上方便地看到配置在被哪些实例使用
提供Java和.Net原生客户端
- 提供了Java和.Net的原生客户端,方便应用集成
- 支持Spring Placeholder, Annotation和Spring Boot的ConfigurationProperties,方便应用使用(需要Spring 3.1.1+)
- 同时提供了Http接口,非Java和.Net应用也可以方便地使用
提供开放平台API
- Apollo自身提供了比较完善的统一配置管理界面,支持多环境、多数据中心配置管理、权限、流程治理等特性。不过Apollo出于通用性考虑,不会对配置的修改做过多限制,只要符合基本的格式就能保存,不会针对不同的配置值进行针对性的校验,如数据库用户名、密码,Redis服务地址等
- 对于这类应用配置,Apollo支持应用方通过开放平台API在Apollo进行配置的修改和发布,并且具备完善的授权和权限控制
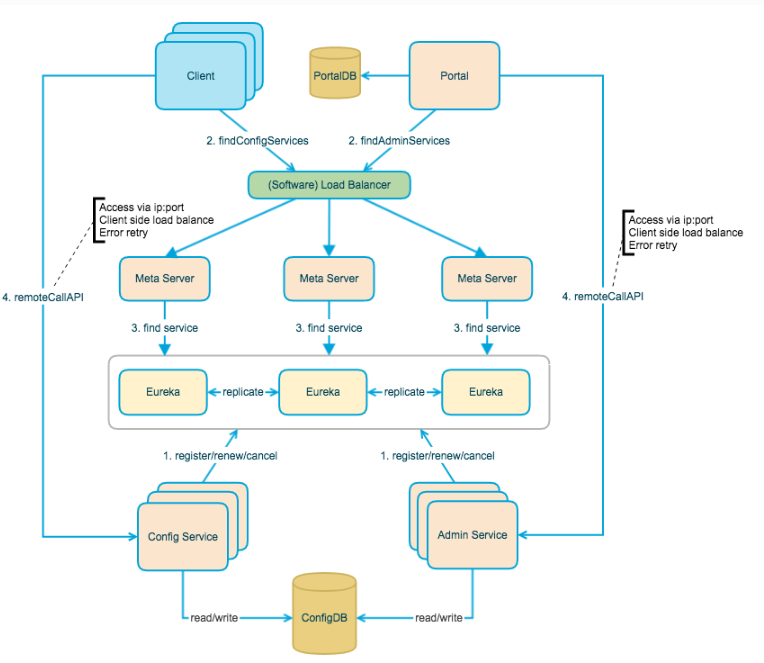
架构概念图

Apollo主要模块
Config Service
提供配置获取、配置更新推送的接口; 主要服务于Apollo客户端;
Admin Service
提供配置管理、修改、发布等接口; 主要服务于Portal;
Meta Server
为Portal提供获取 Admin Service 服务列表; 为Client提供获取 Config Service 服务列表;
Eureka
提供服务注册和发现功能(基于Eureka和Spring Cloud Netflix); Config Service和Admin Service会向Eureka注册服务,并保持心跳; 为了简单起见,目前Eureka在部署时和Config Service是在一个JVM进程中的(通过Spring Cloud Netflix);
Portal
提供Web界面供用户管理配置; 通过Meta Server获取Admin Service服务列表(IP+Port),通过IP+Port访问服务; 在Portal侧做load balance、错误重试;
Client
Apollo提供的客户端程序,为应用提供配置获取、实时更新等功能; 通过Meta Server获取Config Service服务列表(IP+Port),通过IP+Port访问服务; 在Client侧做load balance、错误重试;
二、k8s分布式部署
1. 环境要求:
- Helm 3
2. Apollo部署内容分布
apollo-configservice部署2份以上apollo-adminservice部署2份及以上apollo-portal部署一份
x1#创建文件夹2mkdir apolloserver3#创建命名空间4kubectl create namespace apollo5
6#添加到仓库,有两个资源 选择其中一个添加7helm repo add apollo https://www.apolloconfig.com/charts8
9helm repo add apollo http://ctripcorp.github.io/apollo/charts10 11#查询仓库中Apollo版本12helm search repo apollo13
14#拉取Apollo-service到本地15helm pull apollo/apollo-service --untar16
17#进入 apollo-service 文件夹中,修改 vaules.yaml配置18vim values.yaml19
修改values.yaml文件中的配置
xxxxxxxxxx181configdb2 nameapollo-configdb3 # apolloconfigdb host4 host"172.11.32.51" # 修改要连接的数据地址5 port33086 dbNameApolloConfigDB7 # apolloconfigdb user name8 userName"root" # 修改用户名9 # apolloconfigdb password10 password"123456" # 修改密码11 connectionStringPropertiescharacterEncoding=utf812 service13 # whether to create a Service for this host or not14 enabledfalse15 fullNameOverride""16 port330617 typeClusterIP18
xxxxxxxxxx401#修改完成后执行2
3helm install apollo-service -f values.yaml -n apollo apollo/apollo-service4
5#记录生成的地址需要填写到 apollo-portal配置中 6    NAME: apollo-service7    LAST DEPLOYED: Tue Aug 16 22:15:07 20228    NAMESPACE: apollo9    STATUS: deployed10    REVISION: 111    TEST SUITE: None12    NOTES:13    Meta service url for current release:14      #此地址需要写入15      echo 'http://apollo-service-apollo-configservice.apollo:8080'16
17    For local test use:18      export POD_NAME=$(kubectl get pods --namespace apollo -l "app=apollo-service-apollo-configservice" -o jsonpath="{.items[0].metadata.name}")19      echo http://127.0.0.1:808020      kubectl --namespace apollo port-forward $POD_NAME 8080:808021 22 23# 查看 apollo-configservice、apollo-adminservice 是否启动24kubectl get pod,svc -n apollo25
26pod/apollo-service-apollo-adminservice-rgtgp   1/1     Running   0          3h2m27pod/apollo-service-apollo-adminservice-zft5b   1/1     Running   0          3h2m28pod/apollo-service-apollo-configservice-9twqp   1/1     Running   0          3h2m29pod/apollo-service-apollo-configservice-pwwxq   1/1     Running   0          3h2m30service/apollo-service-apollo-adminservice    ClusterIP   10.1.19.161 8090/TCP   3h2m31service/apollo-service-apollo-configservice   ClusterIP   10.1.142.29 8080/TCP   3h2m32
33#退出到上一级文件夹34cd ..35
36#拉取 apollo-portal服务37helm pull apollo/apollo-portal --untar38
39#进入 apollo-portal 文件夹中,修改 vaules.yaml配置40vim values.yaml
修改values.yaml文件中的配置
xxxxxxxxxx401#填写记录的地址,增加环境变量2#因已是生产环境,则写 pro3
4config5 # spring profiles to activate6 profiles"github,auth"7 # specify the env names, e.g. dev,pro8 envs"pro" 9 # specify the meta servers, e.g.10 # dev: http://apollo-configservice-dev:808011 # pro: http://apollo-configservice-pro:808012 metaServers13 devhttp//apollo-service-apollo-configservice.apollo808014
15 # specify the context path, e.g. /apollo16 contextPath""17 # extra config files for apollo-portal, e.g. application-ldap.yml18 files19
20
21
22
23portaldb24 nameapollo-portaldb25 # apolloportaldb host26 host"172.11.32.51" # 修改要连接的数据地址27 port330828 dbNameApolloPortalDB29 # apolloportaldb user name30 userName"root" # 修改用户名31 # apolloportaldb password32 password"123456" # 修改密码33 connectionStringPropertiescharacterEncoding=utf834 service35 # whether to create a Service for this host or not36 enabledfalse37 fullNameOverride""38 port330639 typeClusterIP40
xxxxxxxxxx161#修改完成之后2
3helm install apollo-portal -f values.yaml -n  apollo apollo/apollo-portal4
5#执行成功,生成结果6NAME: apollo-portal7LAST DEPLOYED: Wed Aug 17 05:28:11 20228NAMESPACE: apollo9STATUS: deployed10REVISION: 111TEST SUITE: None12NOTES:13Portal url for current release:14  export POD_NAME=$(kubectl get pods --namespace apollo -l "app=apollo-portal" -o jsonpath="{.items[0].metadata.name}")15  echo "Visit http://127.0.0.1:8070 to use your application"16  kubectl --namespace apollo port-forward $POD_NAME 8070:8070
因服务不能对外访问,需要增加yaml配置对外映射服务端口
仅对 apollo-configservice、apollo-potal 两个服务对外映射
xxxxxxxxxx441# cd .. 在apolloserver目录下2 vim ingress-apollo.yaml3
4
5apiVersionv16kindService7metadata8 namespaceapollo9 nameapllo-svc-config-node-port10 labels11 appapollo12spec13 typeNodePort14 ports15port808016 targetPort808017 nodePort30080 #对外映射的端口18 selector19 appapollo-service-apollo-configservice20
21---22apiVersionv123kindService24metadata25 namespaceapollo26 nameapllo-svc-portal-node-port27 labels28 appapollo29spec30 typeNodePort31 ports32port807033 targetPort807034 nodePort30080 #对外映射的端口35 selector36 appapollo-portal37
38
39
40# 修改完成后执行此服务41 kubectl apply -f ingress-apollo.yaml42 43 end44# 至此创建完成3. 后记命令
xxxxxxxxxx61#更新配置2helm upgrade apollo-service . -f values.yaml -n apollo3
4#卸载服务5helm uninstall apollo-service -n apollo apollo/apollo-service6helm uninstall apollo-portal -n  apollo apollo/apollo-portal
三、Apollo使用
1. Apollo使用方式
portal为界面管理地址为{IP}+{apllo-svc-portal-node-port服务对外映射端口号}
界面登录默认账号:apollo
界面登录默认密码:admin
config为客户端调用地址为{IP}+{apllo-svc-config-node-port服务对外映射端口号}
2. Apollo初始化
- 右侧菜单系统参数 输入organizations 查询部门参数创建新部门
- 添加设置AppId:
tsmicronet
默认application 私有 properties 命名空间
此命名空间是本AppId下通用的
需要手动创建通用配置
xxxxxxxxxx111 Key RedisConfig2 value { "ConnString": "redis:6379", "DefaultDatabase": 2, "Password": "" }3 备注 redis配置4 5 Key LoggerApi6 value http://172.11.32.80:30004/api/Logger/WriteLogger 7 备注 日志记录地址8 9 Key AuthUrl10 value http://172.11.32.80:30003 11 备注 Identityserver,权限校验Url
创建identityserver 私有 json 命名空间
xxxxxxxxxx191{2 "AppClientId": "AppClient",3 "AppIp": "http://172.11.32.80:30011",4 "AppletClientId": "AppletClient",5 "AppletIp": "http://172.11.32.80:30012",6 "CertificatePassword": "123456",7 "CertificatePath": "ids4.pfx",8 "HomeUrl": "http://172.11.32.80:30009/Login?isexternal=1",9 "Ids4ConnectionStrings": "Database=microidentityserverdb-linux;Uid=root;Pwd=123456;",10 "Issuer": "http://172.11.32.80:5401",11 "MVCIp": "http://172.11.32.80:30007",12 "ManagerUrl": "http://172.11.32.80:30010/Login?isexternal=1",13 "MvcClientId": "MvcClient",14 "UserConnectionStrings": "Database=microidentitydb;Uid=root;Pwd=123456;",15 "VUEIp": "http://172.11.32.80:30009",16 "VueClientId": "VueClient",17 "VueManageClientId": "VueManageClient",18 "VueManageIp": "http://172.11.32.80:30010"19}3. Dapr中的配置
创建初始化秘钥文件,并执行。
xxxxxxxxxx91vim local-secrets.txt 2
3AppId=tsmicronet                      # Apollo中的AppId4MetaServer=http://172.11.32.80:30081  # Apollo中的ConfigServer的Url5RedisHost=redis:63796RedisPassword=7
8#创建完成后加入到k8s secrets中9kubectl create secret generic daprsecrets --from-env-file=local-secrets.txt -n netapp-demo xxxxxxxxxx171# 创建秘钥管理配置 k8s2vim secretstore-k8s.yaml3
4apiVersiondapr.io/v1alpha15kindComponent6metadata7 namelocal-secret-store8 namespacenetapp-demo9spec10 typesecretstores.kubernetes11 versionv112 metadata13
14
15#创建完成后执行16kubectl apply -f secretstore-k8s.yaml17